UVM – UVM Vivado Script – UVM Python Script
The UVM (Universal Verification Methodology) workflow is centered around creating a testbench that integrates key UVM components such as drivers, monitors, and scoreboards, alongside the essential UVM library setup. Numerous commercial tools are available for simulating and verifying digital designs, including ModelSim, Cadence Xcelium, Synopsys VCS, Aldec Riviera-PRO, and Vivado Simulator. Another excellent option for experimenting with small-to-medium-sized verification projects is EDA Playground. EDA Playground offers the advantage of requiring no installation and provides access to multiple simulators for the design. Personally, I opted to use Vivado Simulator for the UVM verification process, as it seamlessly integrates into my existing workflow.
Vivado installation guide can be found here.
Vivado Setup for UVM Simulation
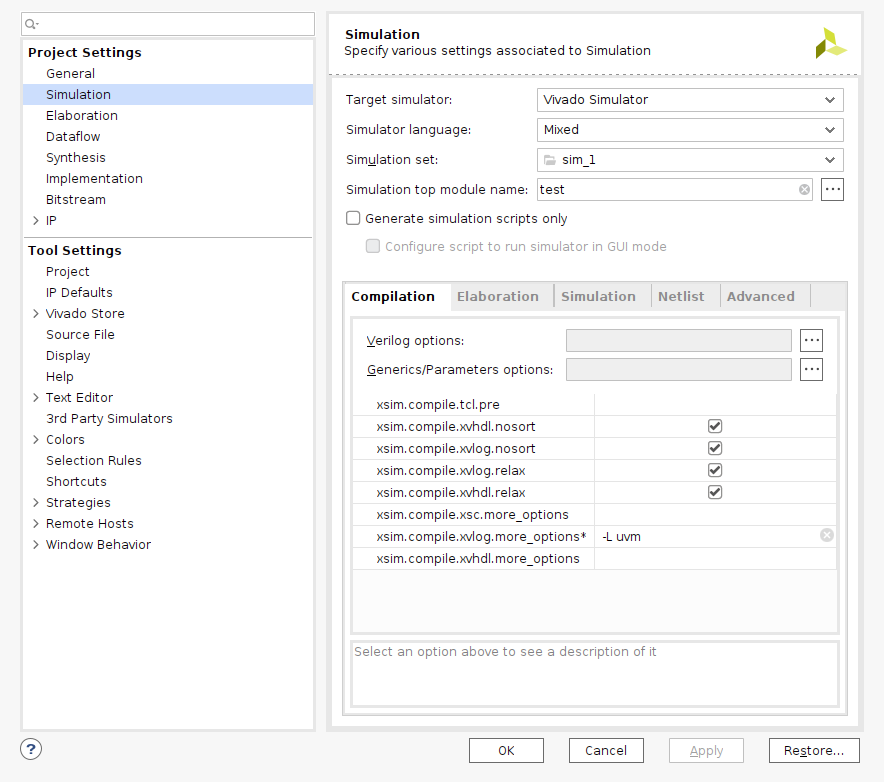
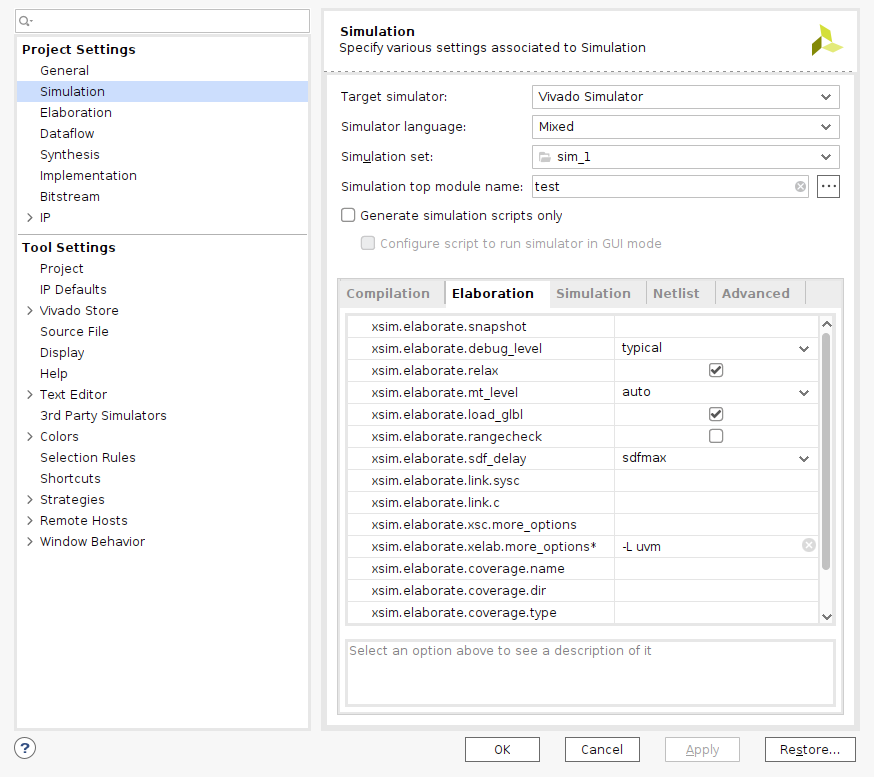
To use a pre-compiled UVM library, you need to adjust two key project settings. Open the project settings and navigate to the simulation section. Here, you will need to configure the settings to ensure the UVM library is properly utilized.
- Under the compilation tab, add “-L UVM” to xsim.compile.xvlog.more_options.

- Under the elaboration tab, add “-L UVM” to xsim.elaborate.xelab_more_options.

When using a tcl file to simulate the design, the following commands should be added to use the UVM library.
set_property -name {xsim.compile.xvlog.more_options} -value {-L uvm} -objects [get_filesets sim_1]
set_property -name {xsim.elaborate.xelab.more_options} -value {-L uvm} -objects [get_filesets sim_1]
UVM Folder Structure
The UVM folder on GitHub is organized into three key subfolders:
- uvm_tcl_script: This folder contains a Tcl file used for running simulations in Vivado. It provides the necessary script to automate the simulation process.
- uvm_templates: This folder includes all the UVM component files. These templates are used to generate the necessary UVM files based on your specific verification design, facilitated by a Python script.
- uvm_verification: Contains all the verification designs. This folder houses a set of designs for verification purposes.
UVM
.
├── uvm_tcl_script
│   └── uvm_run.tcl
├── uvm_templates
│   └── < UVM Component files >
└── uvm_verification
    └── test
    .
    .
    .
Python Script
Python scripts are utilized to streamline the setup of UVM verification environments. When [uvm_design.py] executed, the script creates a new folder within the uvm_verification directory, named after the specified design. Inside this folder, it generates essential files such as the driver, sequencer, monitor, and scoreboard, based on predefined UVM templates.
Additionally, the uvm_run.py script can be used to automatically create a Vivado project within the design folder. The project will be named verif, facilitating a smooth setup for your verification workflow.
These scripts automate and simplify the process of initializing UVM projects and Vivado environment, enhancing efficiency in the verification tasks.
uvm_design.py <design_name>     // create the design
uvm_run.py    <design_name>     // execute the simulation
uvm_clean.py                    // removes the project and log files created by Vivado
The Python scripts that I use in my workflow are organized in a dedicated folder available at Python Scripts on GitHub. To ensure you can run these scripts from any directory in your terminal, you need to add the folder path to your .zshrc or .bashrc file. This step is essential for seamless execution of the scripts across your system.
Verification Flow
Create the Design: Execute the [uvm_design.py] Python script to generate the design files. This script will create a design folder and populate the uvm_verification directory with all necessary files.
Complete the UVM Verification Files: Finalize and customize the UVM verification files to suit your specific verification needs.
Run the Design: Use the uvm_run.py script to initiate the simulation of your design.
Example Test
To test the UVM scripts, a simple test design is created which is shown below.
`include "uvm_macros.svh"
 import uvm_pkg::*;

module tb_test;

   initial begin
        `uvm_info("RUN_TEST", "Vivado Script Simulation Test", UVM_NONE);
   end

endmodule
The primary objective of this design is to print a string using the uvm_info function. This design serves as a basic example to ensure that the UVM scripts are functioning correctly and that the information is being output as expected.
uvm_verification
.
└── test
    ├── tb_test.sv
    └── verif
        ├── tb_test.cache
        ├── tb_test.hw
        ├── tb_test.ip_user_files
        ├── tb_test.sim
        └── tb_test.xpr
The design files are organized under the test directory, ensuring that all source code is conveniently located in one place. Testbench top module is labeled as the design name prefixed with ’tb’. For the design example, the design name is ’test’, and ’tb_test’ is the testbench top module. When you execute the uvm_run.py script, a new Vivado project is generated within the verif directory. This structure helps maintain a clear separation between design sources and verification projects, streamlining the workflow and project management.

Below is the result of the simulation. The design outputs the string “[RUN TEST] Vivado Script Simulation Test” as intended.
